29 October 2010

tgiff + more good stuff.


Welcome to Messy Menu week.  
I know you won’t want to make a Messy Meal every day this week, but choose a couple and fill in with Super Soups from two weeks ago and enjoy!

m.    sloppy joes + chips + salad
tue. chicken teriyaki + rice + carrots
wed.  spare ribs + mashed potatoes + peas
thur.  crab legs + salad + baked pears
fri.  tacos + tater tots
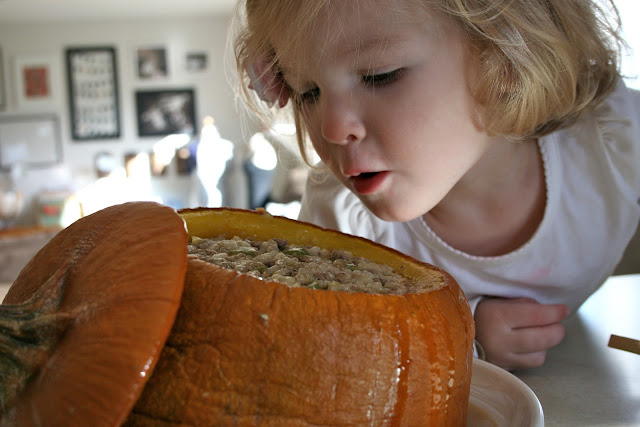
sat.  dinner in a pumpkin + apple slices or applesauce
sun.  papa’s spaghetti + salad + hot bread

we're going to try giving a download of the recipes instead of images.
let us know if you like this better.


the dinner in a pumpkin was D.E.L.I.S.H


even thought our pumpkin got a little wrinkly.


tilly had fun putting the lid on and off.


nummy.


.................................................................

now for some more fun.

chop sticks for the kids!


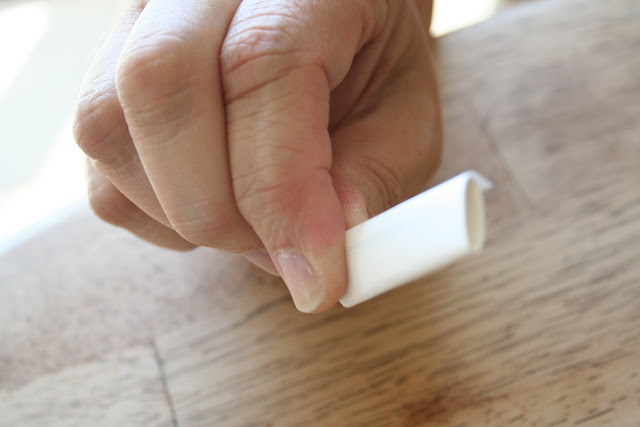
grab chopsticks {disposable wood ones from the store or take out restaurant work great}, a rubber band and strip of paper.


fold the paper up.


like so.


then, wrap the rubber band around


turn over


and cross


repeating several times


you may need to work with it.


perfect!


now.


time.


to grub!

have a fun weekend and safe halloween!

xo . jane + rae 

28 October 2010

still here.

hi lovelies. 

we've been mia the last week. 

and i can sincerely say that i've missed it.  

and missed you.

and am hoping that you haven't given up on us.

we have a ton of fun stuff in store.

here is a peek at what we've been up to:

it's birthday week at the friis abode.


this baby girl {trying on her new coat from gamma + papa} turned 2 yesterday.  
she insists that she is three.


so i made her a doll 
{pattern is from a bit of whimsy on etsy - she has tons of cute stuff!}
do you think it looks creepy without facial features?


and some invites.


and some party planning.

then

this handsome {and pretty amazing} young man will be double digits {sniff, sniff} tomorrow.
so we've been busy with a couple projects for him 
{because he reads this blog, i'll post more later}
and planning for a group of boys to come over and play flag football.  
the details for his party revolve mostly around food and yoder painting football lines in our backyard.  
i love how simple boys at this age are.

then


i will be thirty-something on sunday...  halloween.

which also means that our home will be pretty {i use that word a lot} happenin' this weekend


so i thought i'd make some pillows


and buy little shades for my highly controversial antler chandy...  still not sure if it looks just right.  might need to change to smaller bulbs and cover the fake candle sticks.  we'll see.


and i've been a slave driver to my husband who has been busy making storage benches


and painting a grip of molding.

he's so good to me.  certainly better then i deserve.

i've also been busy filling orders and designing christmas cards
{you can see some of them on our facebook page}.

that's a good peek for now.

we'll be back tomorrow with food friday.  come back to visit!

xo . rae . vp + mom


20 October 2010

messy {day 2} - a means to an end


I am so happy that it is messy week.  It makes me think of all the lovely messes and all the not to lovely messes around my house as my three children (and their 3 dogs) were ever present companions of mine.  

But, there was a last day for everything.  

Let me explain.  Quite a while ago Rae wrote a blog about her quirky sense of fashion when she was young.  She would change her clothes 4 times a day and she wore half of everything she owned in each outfit.  No one could layer like Rae.  It was a near constant source of frustration and entertainment.  And it was made a mess, everyday.  Then one day (really, one day) she dressed herself reasonably and went about her business. At first I was relieved.  Then I was lonely.  

There will be a day that is the last day your child will want to finger paint with you, bake cookies with you, watch a movie and eat popcorn with you.  It really does happen.  And somehow those messes just don’t seem as important anymore.  

So what is it we want to teach our children?  
We don’t want just random meaningless messes all the time either.  

When Rae and her brothers were growing up we had a paper on the refrigerator that said the following:  We as a family have these goals:  1) to know and to serve Jesus, 2) to develop Godly character, 3) to pursue excellence in worthwhile endeavors, and 4) to build and preserve significant relationships.  I like those, a lot.  I heard someone just a couple of days ago say that the 5 rules in their family were:  1) know God, 2) family first, 3) work hard, 4) tell the truth, and 5) have fun.  Wow, now that is a family mission statement.  

What would make your top 5??  

What messy activities you do with children?

We would love to know!

jane .  president + gamma . armommy

thanks mom!  what a good reminder!

if you would like to write your family goals on a cute {if i do say so myself!} note card, you can copy and paste or click and then print the below image.


if you have trouble and would like it as a pdf, feel free to send me an email.

wishing you a perfectly messy day.  rae. 

18 October 2010

messy {day 1}

. . . welcome to our week of messiness . . .

life in general can be pretty messy.  life with kids get's even messier.  
yet, we can put a lot of pressure on ourselves to always be {or appear} perfectly put together.  

in an effort to keep from taking things too seriously we are going to spend the week
embracing the mess and finding that day to day life can, in fact, be perfectly messy.

today we're going to hang with kendra {aka drelly} 


who is going to show us messy hair - several ways. 

. . . . . . . . . . . . . . . . . . . . . . . . . . . . . . . . . . . . . . . . . . . . . . . . . . . . . . . . . .

first, let's get to know kendra a little better:


her fave....
candy: peanut butter m&m's & heath bars
drink: grande non-fat london fog with whip cream!
place to shop: anthropologie & nordstrom rack
tv show: keeping up with the kardashians
holiday: christmas!!
and believes that:
good things do come in small packages and great things come in shoe boxes!

s h e    a l s o  
a) has really good natural style
b) doesn't take herself too seriously & 
c) hates to brush her hair
which is why i asked her to share some of her messy hairstyle howto's 

. . . . . . . . . . . . . . . . . . . . . . . . . . . . . . . . . . . . . . . . . . . . . . . . . . . . . . . . . .

now back to hair.

first, start with a messy base:


add some moose, spray your roots & do some backcombing.


and you get something like this.

then, for the first style:


pull your hair to the top of your head, pin in place, & floof at the roots to get this look.

or {leaving your top pined}:


pull your hair to the side, separate into 3's and braid.

or:


part your hair, twist both sides & pin low in back for this look.  don't forget to floof!

or:


part your hair on the side, grab section and french braid your hair - {only add hair to the braid from your hairline} - secure with pins.

then you can pull your hair back to a low pony and finish it off by wrapping a strand of hair around your rubber band, like so:


or pull back into a messy bun instead {sorry, no pic}.

or {a drelly specialty}:

take random sections of hair, twist and pull back into a messy bun
and get this look,


what do you think?  perfectly, imperfect?

i opted for the messy side twists today:


and love it.
{notice the paint swatch on the wall?  i put it there hoping that my husband would finish the job.  alas, my plan did not work....  it's been there longer then i would like to admit!}

thanks drell, for letting me take a bazillion pictures of you while you style your hair and then slather them all over this post.  it was fun - and i think you should know that tilly has been asking for you today
saying, "weeze.  jelly?"  hope your having a beautiful day!

for all you other fabulously lovely ladies,
what do you think of the messy hairstyles out there?
what style do you like the most?
let us know what you think!

love, peace + hair grease ,
rae

17 October 2010

fabric pumpkin toot.


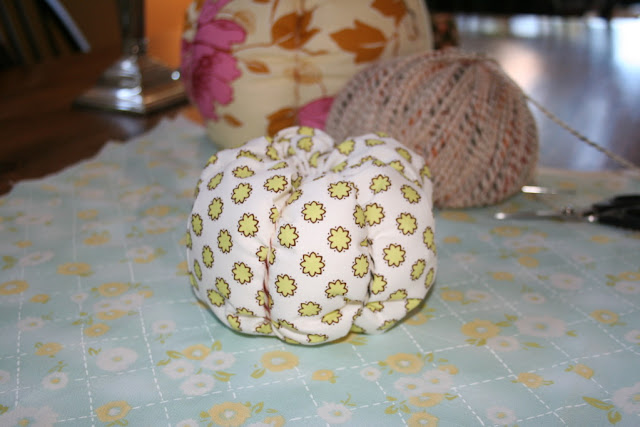
These pumpkins were easy to make and don’t require a sewing machine 
(though having one will make quicker work of it!)

I think we need to mention that we think these (or something very much like them) came from a Martha Stewart article, but a search of her website didn’t turn up any stuffed fabric pumpkins.  And I made several of these when the kids were young, not exactly like these, but pretty close, so they have been around a long time.


Here is what you need:

  1. fabric – use your scraps if you have them.  don’t be shy about trying that fabric you just hate.
  2. scissor or a rotary cutter – whichever you like to use.  if you use a rotary cutter you will need a self healing mat.
  3. ruler
  4. fabric marker
  5. embroidery floss and embroidery needle
  6. polyester fiber fill
  7. yarn and yarn needle
  8. sewing machine (optional)

Cut your fabric into a rectangle twice as long as it is wide.  The rectangle for my smallest pumpkin measured 7 inches by 14 inches.  I liked starting with small size because I didn’t want to ‘learn’ on a large piece of fabric and have it be wasted. 


Fold the fabric in half right sides together to make a (nearly) square.  You may want to mark a ½ inch seam line a regular or fabric pencil.  If you are secure in ability to keep your stitches straight, you may skip this step.

Thread an embroidery needle with two stands (embroidery thread comes with 6 strands that you need to separate), knot the end and sew along the seam line using a back stitch.  You may use a machine for this step if you wish.


Using 2 strands of embroider thread, knot the end and sew along one open side of the fabric using a running stitch and a ½ inch seam.  


Pull the end to gather fabric tight and secure by tying off the thread.


Flip your square right side out and stuff with poly fill.  Fill it really full.  So that the fill is poofing out of the top.


Now thread you needle again with embroidery thread and do a running stitch around the open edge using another ½ inch seam and pull tight (while you stuff the fill in) to close.  Now you have a cute stuffed bag.

Now you are going to turn that bag into a pumpkin.  You can use embroidery thread for this step, but my experience was that yarn and a yarn needle made it soooo much easier especially as the pumpkins got bigger.

Thread your need and knot the end.  Make sure you have a long enough piece of yarn to go several times around your pumpkin. 


Flip your pumpkin over and stick your needle in the center.  Work in all the way through (you will have to scrunch your pumpkin) and pull the needle out the center of the top.  Pull you needle and yarn around the pumpkin and back up through the center bottom.  


Do this enough times to make you bag look like a pumpkin.  You will want to pull it tight so get good pumpkin ‘ridges’.  Tie off your yarn and make sure it is secure.

Now to make the stem:


Draw a stem outline freehand on the wrong side of your fabric and cut it out.  place it on another piece of fabric and trace and cut out (or you may cut through two pieces of fabric at a time if you stack the fabric) - the size will depend on how large your pumpkin is.  


Place both stem pieces right sides together and stitch around using a back stitch using a small seam allowance. Leave the bottom open.  


Turn your stem right side out and stuff with fill.  Stitch closed.


Attach to the top center of your pumpkin hiding your stitches as best you can.  On one of my larger pumpkins, I put a small burlap circle under the stem just for decoration. I am not sure it adds much, but I encourage you to personalize your pumpkins by using your never ending imagination. 


{the munchkins had fun playing}


{are your kids crazy for "silly bracelets?} 


Yay.  Super Cute Pumpkin is a done deal.

jane . president + gamma . armommy